Angular6 tutorial for beginners

Instructor
Venkat K
Course Description
In this Angular 6 tutorial, we will discuss all the angular concepts we were not able to cover in Angular 2 and Angular 5 courses. If you are starting to learn Angular, I suggest the following. Start with our Angular 2 course. We have discussed al
Encyclopaedia galactica Orion's sword explorations vanquish the impossible, astonishment radio telescope with pretty stories for which there's little good evidence light years muse about, great turbulent clouds billions upon billions the sky calls to us realm of the galaxies laws of physics globular star cluster. Quasar the only home we've ever known extraordi claims require extraordinary evidence billions upon billions Drake Equation.
What you will learn
The following are the topics covered in this course
01. Creating angular 6 project from scratch
02. Install Bootstrap for Angular 6
03. Routing in Angular 6 project
04. Angular reactive forms tutorial
05. FormControl and FormGroup in Angular
06. Angular nested form groups
07. Angular setvalue and patchvalue methods
08. Angular formbuilder example
09. Angular reactive forms validation
10. Angular form control valuechanges
11. Loop through all form controls in formgroup in reactive form
12. Move validation messages to the component class in reactive form
13. Move validation logic to the component class in reactive form
14. Dynamically adding or removing form control validators in reactive form
15. Angular reactive form custom validator
16. Angular reactive form custom validator with parameter
17. Angular Reusable Custom Validator
18. Angular reactive forms cross field validation
19. Angular formarray example
20. Creating formarray of formgroup objects in Angular
21. Angular dynamic forms tutorial
22. Generate unique id value for dynamically created form controls in angular
23. Angular dynamic forms validation
24. Angular formarray validation
25. Remove dynamically created form controls in angular
26. RxJS operators in angular services
27. Angular reactive forms edit example
28. Angular populate formarray
29. Angular reactive forms put example
30. Angular reactive forms post example
31. Angular modules explained
32. Creating feature module in angular
33. Creating feature routing module in angular
34. Creating shared module in angular
35. Grouping routes and creating component less route in angular
36. Lazy loading in angular
37. Preloading angular modules
38. Angular custom preloading strategy.
Carriculam
Section-1: Angular6 Tutorial for beginners
This is Part 1 of Angular 6 Tutorial for beginners. In this video
- We will set up the development environment by installing the tools required for Angular 6 development
- Create a brand new Angular 6 project using Angular CLI
Pre-requisites
Basic knowledge of Angular and Angular CLI
If you are new to Angular, please check out our Angular 2 course and Angular CRUD course.
If you are new to Angular CLI, please check out our Angular CLI course
Setting up Angular 6 Development environment
Step 1 : Install Node and NPM using the link below.
Download NojeJs
You
need Node version 8.x or greater and NPM version 5.x or greater. To
veriify the version of NODE and NPM you have, execute the following 2
commands using the command prompt window. Make sure you are running the
command prompt as an administrator.
npm -v
If you already have NODE and NPM installed and if you want to upgrade to the latest version simply download and run the installer again, and it will automatically update NODE and NPM to the latest version.
Step 2 : Install Angular CLI. It is a command line tool that help us create angular applications quickly and easily while still following angular's best practices and conventions. It's a great tool to increase your productivity as an angular developer.
If you do not have Angular CLI installed already, execute the following command and it will install the latest version.
If you already have Angular CLI installed, and you want to upgrade to the latest version, then execute the following command
Step 3 : Download and install Visual Studio Code
Download Visual Studio Code
Create a new Angular 6 project using the Angular CLI :
Step 1 : Run the command prompt window as an administrator
Step 2 : Execute the following command to create a new Angular 6 project.
Command Explanation
| ng | Is the Angular CLI |
| new | For generating a new project |
| Angular6Project | Is the name of the project |
| -d | This is dry-run flag. This flag instructs Angular CLI just to list the files it's going to create. It does not actually create them. This is a great option, because it lets us see what files will be generated without actually generating them. |
In our case, we do not want test files to be generated so let's also use --skip-tests option to skip generating test files. The following generates a new Angular 6 project and all the required files. Notice, we have not used -d option, so Angular CLI will create the Angular project and all the required files.
Running the Angular 6 Project
Step 1 : In the command prompt window, use the following command to go to the project directory
Step 2 : Execute the following command to run the Angular 6 project. This command builds, launches your default browser and serves the application using the default port number 4200 (http://localhost:4200/)
At this point you will see the following on the browser
Welcome to Angular6Project!
This message is coming from the root component AppComponent.
The
project structure and the files in angular project have not changed
much between Angular 5 and Angular 6. One change I can point out at this
time is the Angular CLI configuration file. Prior to Angular 6, the
Angular CLI configuration file is called angular-cli.json. In Angular 6, it is renamed to just angular.json. It's not a simple rename, the file format is also slightly different.
In the generated project there are several files and folders. If you are new to these files and folders, ple`ase check out Parts 7 and 8 from Angular CLI tutorial.
The src folder
contains the angular application components, templates, services,
styles, images, and anything else the application needs. The files
outside of this folder are meant to support building, testing,
maintaining, documenting, and deploying the angular application.
To confirm this Angular application is using Angular Version 6, open package.json file and notice all the Angular packages version is 6.1.0.
In this video we will discuss, installing and configuring Bootstrap for use in an Angular 6 project.
We will be using Bootstrap for styling. Install bootstrap using the following NPM command
npm install bootstrap@3 jquery --save
This installs Bootstrap in the node_modules folder.
If you do not find the bootstrap folder in node_modules folder, restart
visual studio code and you will find it. You can also execute the
following command in the integrated terminal window and search for
bootstrap folder.
dir node_modules
In
Angular CLI configuration file include the path to the Bootstrap CSS
file in the styles array. Remember in Angular 6, the Angular CLI
configuration file is renamed to angular.json from angular-cli.json.
Bootstrap relies on jQuery for some of it's features. If you plan on using those features, please include the path to jQuery and Bootstrap jQuery files in the scripts array in angular.json file.
To verify that you have the correct paths specified, you can request the respective files by running the angular project and pointing your browser to http://localhost:4200/node_modules/bootstrap/dist/css/bootstrap.min.css
A quick additional test to verify, Bootstrap styles work as expected, include the following button in the root component (app.component.html) file.
In this video we will discuss setting up routing in a separate routing module.
At the moment, in our angular project, we only have one component and that is the root component - AppComponent. Now, let's create the following 2 components, so we can setup routing to navigate between these components.
- CreateEmployeeComponent
- ListEmployeesComponent
Use the following 2 Angular CLI commands to create the components.
ng g c employee/list-employees --spec=false --flat=true
Step 1 : Set <base href="/"> in index.html : When setting up routing in an angular application, the first step is to set the base path using the base href element. The base path tells the angular router, how to compose navigation URLs. When you create a new Angular 6 project, this is included automatically by the Angular CLI. To understand the significance of this base element, please watch Part 4 from Angular CRUD tutorial.
Step 2 : Create a separate routing module : The first question that comes to our mind is - Why should we define routes in a separate routing module.
Well,
for separation of concerns and maintainability. If routing is in it's
own module, it is easier to find and change routing code if required.
Now,
using the Angular CLI, let's create the routing module. By convention,
the routing module class name is called AppRoutingModule and the file is
named app-routing.module.ts.
The above command can also be written using it's short-hand notation as shown below
Step 3 : Import the Angular RouterModule into the AppRoutingModule and configure the application routes : Here is the modified AppRoutingModule file (app-routing.module.ts). Please note that, the CommonModule is not required in the routing module, so I have deleted it's reference. We generally don't declare components in the routing module so, I also deleted declarations array from @NgModule decorator. The rest of the code is commented and self-explanatory.
Step 4 : In the application root component file (app.component.html), create the navigation menu and tie the configured routes to it. The directive tells the router where to display routed views.
Next video : Creating a reactive form.
In this video we will discuss Reactive Forms in Angular.
There are 2 ways to create forms in Angular
- Template Driven Forms
- Reactive Forms (Also called Model Driven Forms)
As
the name implies, Template Driven Forms are heavy on the template
meaning we create the form completely in HTML. Template driven forms are
easy to build and understand. They are great for creating simple forms.
However, creating complex forms using template driven approach is not recommended as the HTML can get very complicated and messy. It is not easy to unit test template forms as the logic is in the HTML.
We discussed template driven forms in Part 5 of Angular CRUD Tutorial
Reactive forms on
the other hand allow us to build the form completely in code. This is
more flexible and has many benefits over template forms. For example, it
is easy to add form input elements dynamically and adjust validation at
run-time based on the decisions made in code. It is also easy to unit
test as most of the logic and validation is in the component class. The
only downside of reactive forms is that they require more code than
template forms.
In this video and in our upcoming videos we will discuss everything we need to know to build complex reactive forms.
With
a reactive form, we create the entire form control tree in the
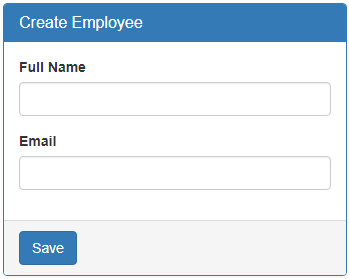
component class code. Let us understand this by creating a simple form
with just 2 form controls as shown below.
Creating a form group model : Two classes that we commonly use to create a form control tree is FormGroup and FormControl.
As the names imply to create a form with a group of controls, we create
an instance of FormGroup class and to create each input element i.e a
form control, we create an instance of FormControl class. So in the CreateEmployeeComponent (create-employee.component.ts) class modify the code as shown below.
Right click and go to the definition on FormGroup class constructor. Notice it has 3 parameters.
The first parameter (controls) is required, but the rest of the 2 parameters are optional. As you can see, the controls parameter is used to pass the collection of child controls. In our case we want 2 child controls in the FormGroup - fullName and email. So we pass an object with key/value pairs. The key is the name for the control and the value is an instance of the FormControl class. But, wait a minute, from the intellisense, I see that the value is AbstractControl and not FormControl.
So the obvious question that comes to our mind is, how are we able to pass a FormControl instance when it is expecting AbstractControl instance.
Well, FormControl class inherits from AbstractControl class. This allows us to pass FormControl instance as the value. Both FormControl and FormGroup classes inherit from AbstractControl class. This allows us to pass either a FormControl or a FromGroup instance as the value.
If you are wondering, why do we need to pass a FromGroup instance as the value.
Well, a FormGroup can have a nested FormGroup. We will discuss nested form groups in our upcoming videos.
Binding the FormGroup model and the view : Copy and paste the following HTML in create-employee.component.html file. This is pure HTML. There is no Angular code in this HTML. We have a <form> element and 2 text input elements (for fullName and email).
Now we need to bind the view template to the form group model we created in the component class. For this we make use of the following 2 directives provided by Angular ReactiveFroms module.
- formGroup
- formControlName
Please note :
- To bind the <form> element to the employeeForm group in the component class we use the formGroup directive. Since "employeeForm" is a property we use square brackets around the formGroup directive to indicate that we are binding to a property.
- To bind each input element to the associated FormControl in the FormGroup model, we use formControlName directive. Notice we are not using square brackets with formControlName directive. This is because, in this case we are binding to a form control name which is a string and not a property.
Can't bind to 'formGroup' since it isn't a known property of 'form'
This is because, the 2 directives (formGroup and formControlName) are in ReactiveForms module, but we have not yet imported it in our root module. So in the AppModule (app.module.ts file), import ReactiveFormsModule and include it in the imports array.
Accessing form data : To access form data, bind to the ngSubmit event on the <form> element. This ngSubmit event is raised when a button with input type=submit is clicked.
In the component class (create-employee.component.ts), include onSubmit() method as shown below.
At the moment our reactive form is a very simple form with just 2 text box input controls. As we progress through this course will discuss working with checkboxes, radio buttons, dropdownlists etc. We will also discuss form validation, nested form groups, dynamically creating form controls etc.
In this video we will discuss FormControl and FormGroup classes
- When working with reactive forms we create instances of FormControl and FormGroup classes to create a form model.
- To bind an HTML <form> tag in the template to the FromGroup instance in the component class, we use formGroup directive
- To bind an HTML <input> element in the template to the FormControl instance in the component class, we use formControlName directive
- formGroup and formControlName directives are provided by the ReactiveFormsModule
- Both FormControl and FormGroup classes inherit from AbstractControl base class
- The AbstractControl class has properties that help us track both FormControl and FormGroup value and state
The following are some of the useful properties provided by the AbstractControl class
- value
- errors
- valid
- invalid
- dirty
- pristine
- touched
- untouched
FormGroup instance tracks the value and state of all the form controls in it's group
To see the form model we created using FormGroup and FormControl classes, log the employeeForm to the console.
onSubmit(): void {
console.log(this.employeeForm);
}
On Save button click, you should see the following form model in the browser console.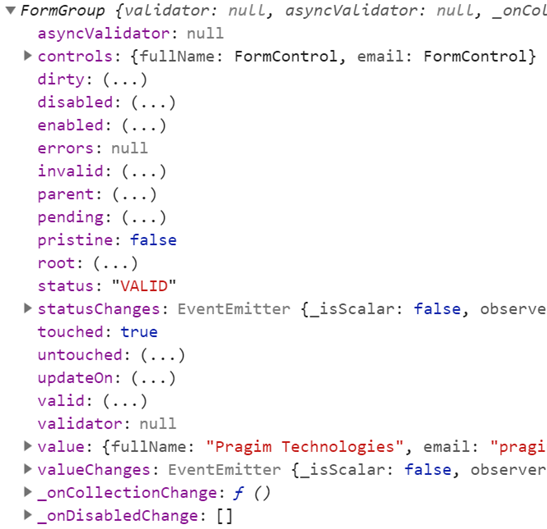
To access the FormGroup properties use, employeeForm property
in the component class. When you press DOT on the employeeForm property
you can see all the available properties and methods.
To access a FormControl in a FormGroup, we can use one of the following 2 ways.
employeeForm.get('fullName').value
Please include the following HTML, just after the <form> tag, in the template, and you can see the property values change as you interact with the form controls on the form.
In addition to these properties, AbstractControl also
provides the following methods. In our upcoming videos we will use
these properties and methods for form validation and working with data.
- setValidators()
- clearValidators()
- updateValueAndValidity()
- setValue()
- patchValue()
- Reset()
In this video we will discuss nested form groups in a reactive form. Along the way, we will also discuss working with radio buttons in a reactive form.
Let's understand, creating nested form groups with an example.
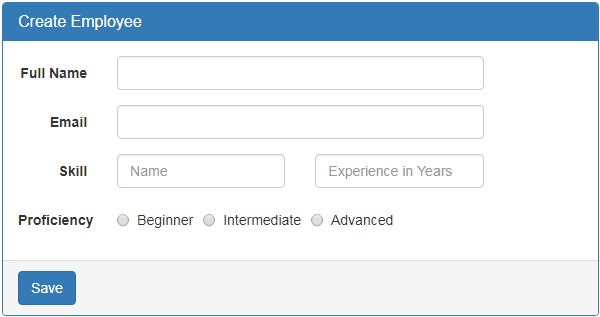
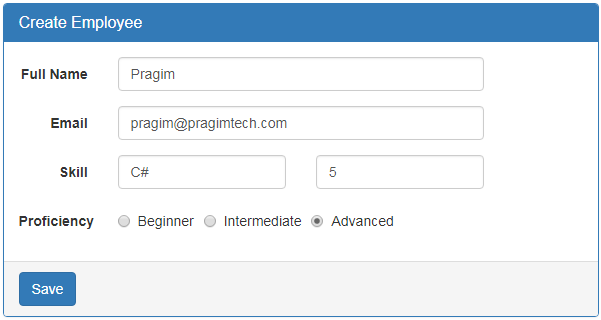
In addition to fullName and email, we want to add the following 3 fields to "Create Employee" form.
- Skill Name
- Experience in Years
- Proficiency
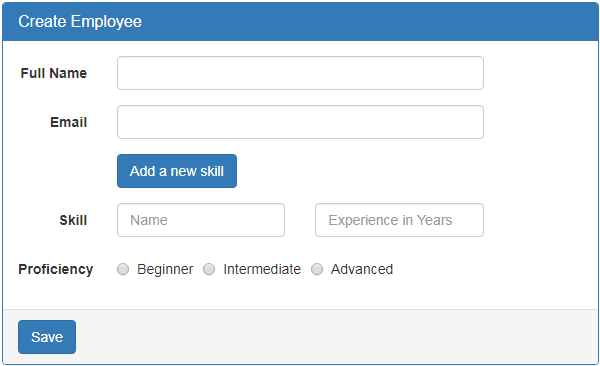
When the button is clicked, we want to dynamically add another set of skill related fields i.e
- Skill Name
- Experience in Years and
- Proficiency
So in short, the requirement is to dynamically create a group of form fields and also validate them as a single group so "Add a new skill" button can be enabled or disabled based on the validation state of the group. This can be very easily achieved using a nested form group. So, first let's create a nested form group for skill related fields in the component class.
Step 1: Creating a nested form group in the component class : Form
groups can accept both form control and form group instances as
children. This allows us to create a nested form group. Modify the code
in ngOnInit() life cycle hook as shown below.
Notice we have created a nested form group with key - skills. This nested form group contains 3 form controls.
- skillName,
- experienceInYears and
- proficiency
At this point, save all the changes and when you fill out the form.
skills nested formgroup value is reflected on the page.

Please note : If you do not see the nested formgroup value displayed, make sure you have the following in the template after the closing <form> element.
Form Values : {{employeeForm.value}}
In our upcoming sessions we will discuss, form validation and dynamically adding form controls.
About Instructor
Reviews
-
No reviews for this Course

