Angular 2 tutorial for beginners
Course Description
This Angular 2 tutorial for beginners course starts from scratch with the basics and covers all the advanced concepts as we progress through the course.
Encyclopaedia galactica Orion's sword explorations vanquish the impossible, astonishment radio telescope with pretty stories for which there's little good evidence light years muse about, great turbulent clouds billions upon billions the sky calls to us realm of the galaxies laws of physics globular star cluster. Quasar the only home we've ever known extraordi claims require extraordinary evidence billions upon billions Drake Equation.
What you will learn
Below are the List we are going to learn in this Course.
1. Angular Components
2. Angular nested components
3. Styling angular components
4. Angular interpolation examples
5. Property binding in Angular
6. Angular attribute binding
7. Class binding in angular
8. Style binding in angular Angular2
9. Event Binding Two way data binding in angular
10 . Angular ngFor directive
11 . Angular ngFor with trackBy
12 . Angular pipes
13 . Angular custom pipe
14 . Angular container and nested components
15 . Angular component input properties
16 . Angular component output properties
17 . Interfaces in Angular 2
18 . Angular component lifecycle hooks
19 . Angular services tutorial
20 . Angular and ASP.NET Web API
21 . Angular 2 http service tutorial
22 . Angular 2 http error handling
23 . Using Bootstrap with Angular 2
24 . Angular 2 routing tutorial
25 . Angular 2 route parameters
26 . Angular dependency injection
27 . Why dependency injection
28 . Angular singleton service
29 . Angular Injector
30 . Angular root injector
31 . Angular router navigate method
32 . Promises in angular 2 example
33 . Angular promises vs observables
34 . Observable retry on error
35 . Angular observable unsubscribe
36 . Difference between Angular JS, Angular 2 and Angular 4
37 . Angular 2 course wrap up and what's next
Carriculam
Section-1: Angular 2 tutorial for beginners
Angular 1 was released in October 2010,
and by far the most popular JavaScript framework available for creating
web applications. Many developers are already using Angular 1, so the
obvious question that comes to our mind is why should we use Angular 2.
Angular 2 is not a simple upgrade from angular 1.
Angular 2 is completely rewritten, so it has lot of improvements when
compared with Angular 1. Let's look at a few of these improvements.
Performance : From a performance standpoint, Angular 2 has faster initial loads, change detection, and improved rendering time. Not just performance, we also have improved modularity, Dependency injection and testability. According to angular conference meetup, Angular 2 is 5 times faster compared to AngularJS 1.
Mobile Support :
Angular 1 was not built for mobile devices. It is possible to run
Angular 1 on mobile but we will have to use other frameworks. Angular 2
on the other hand is designed from the ground up with mobile support.
Mobile device features and limitations like touch interfaces, limited
screen real estate, and mobile hardware have all been considered in
Angular 2. So with Angular 2 we can build a single application that
works across mobile and desktop devices.
Component Based Development : Component
based web development is the future of web development. In Angular 2,
"everything is a component". Components are the building blocks of an
Angular application. The advantage of the component-based approach is
that, it facilitates greater code reuse. From unit testing standpoint,
the use of components make Angular2 more testable. We will discuss what a
component is and how to build components with examples in detail, in
our upcoming videos.
More language choices : There are several languages that we can use to develop Angular applications. To name a few, we have
1. ECMAScript 5
2. ECMAScript 6 (also called ES 2015)
3. TypeScript etc.
Besides
these 3 languages we can also use Dart, PureScript, Elm, etc, but among
all these, TypeScript is the most popular language.
Angular
2 itself, is built using TypeScript. TypeScript has great support of
ECMAScript 6 standard. So the obvious questions that come to our mind at
this point are
1. What is ECMAScript
2. Wha is Type Script
What is ECMAScript :
The JavaScript language standard is officially called ECMAScript. Over
the past several years many versions of ECMAScript were released
starting with ECMAScript version 1 all the way till ECMAScript version
7.
Most
of the modern browsers available today support ECMAScript 5. The
browser support for ECMAScript 6 is still incomplete. However, using a
process called Transpilation, ECMAScript 6 can be converted to
ECMAScript 5 which is supported by all the modern browsers. ECMAScript 6
is officially known as ECMAScript 2015. ECMAScript 2015 introduced
several new features like classes, modules, arrow functions etc.
If
you are interested in reading more about the ECMAScript standard and
what these different versions of ECMAScript have to offer, please refer
to the the following Wikipedia article.
https://en.wikipedia.org/wiki/ECMAScript
Wha is Type Script :
TypeScript is a free and open-source programming language developed by
Microsoft. It is a superset of JavaScript and compiles to JavaScript
through a process called transpilation. Using TypeScript to build
angular applications provides several benefits.
1. Intellisense
2. Autocompletion
3. Code navigation
4. Advanced refactoring
5. Strong Typing
6.
Supports ES 2015 (also called ES 6) features like classes, interfaces
and inheritance. If you have any experience with object oriented
programming languages like C# and Java, learning TypeScript is easy.
Because
of all these benefits writing, maintaining and refactoring applications
can be an enjoyable experience. So obviously TypeScript has become the
number one choice of many developers for developing Angular
applications.
For
this course we will be using Visual Studio as the code editor. Besides
Visual Studio, TypeScript is supported by several other editors like
1. Visual Studio Code
2. Eclipse
3. WebStorm
4. Atom
5. Sublime Text etc.
So you can use any favourite editor of your choice to build Angular 2 applications using TypeScript.
In our next video, we will discuss Setting up Angular 2 in Visual Studio.
In this video we will discuss how to set up Angular 2 in Visual Studio.
Step 1 :
The first step is to install Node.js and npm. It is recommended that
you have node version 4.6.x or greater and npm 3.x.x or greater. To
check the versions that you have on your machine type the following
commands in a command window.
node -v
npm -v
You
can get the latest version of Node.js from the following website. Click
on the correct download link depending on the Operating System you
have.
https://nodejs.org/en/download/
I have Windows 64 bit Operating system, so I have downloaded 64 - bit windows installer.
- Click the Start icon ,
- Type "System" in the Start Search box, and then click System Information in the Programs list.
- Select "System Summary"
- In the right pane if
- System type is x64-based PC, then you have 64-bit operating system
- System type is x86-based PC, then you have 32-bit operating system
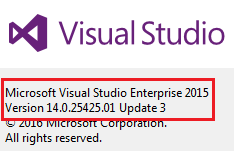
Visual Studio Enterprise 2015 - Update 3
Visual Studio Professional 2015 - Update 3
Visual Studio Community 2015 - Update 3
Step 3 : Configure environment settings for node and npm in Visual Studio
- In Visual Studio click on Tools - Options.
- In the "Options" window, expand "Projects and Solutions" and select "External Web Tools"
- In the right pane, move the global $(PATH) entry to be above the internal path $(DevEnvDir) entries. This tells Visual Studio to look for external tools (like npm) in the global path before the internal path.
- Click "OK" to close the "Options" window and then restart Visual Stduio for the changes to take effect

Step 4 : Install TypeScript for Visual Studio 2015
- To develop Angular applications you need TypeScript 2.2.0 or later
- To check the version of TypeScript, clik on the "Help" menu in Visual Studio and select "About Microsoft Visual Studio"
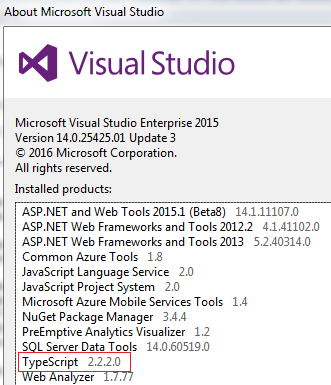
- Download and install the latest version of TypeScript for Visual Studio 2015 from the following URLhttps://www.microsoft.com/en-us/download/details.aspx?id=48593
- After installing TypeScript, the installation wizard prompts you to restart Visual Studio. So, please restart Visual Studio for the changes to take effect.
- Run Visual Studio as Administrator
- Click on File - New Project
- Select "Web" under "Visual C#". From the right pane select "ASP.NET Web Application"
- Name the project "Angular2Demo"
- On the next screen, select "Empty" template and click "OK"
https://github.com/angular/quickstart
Step 7 : Copy the required "Starter files" to the web application project
We do not need all the starter files that we downloaded. As you can see from the image below, we need 4 folders/files
- src folder and it's contents
- bs-config.json
- package.json
- tslint.json
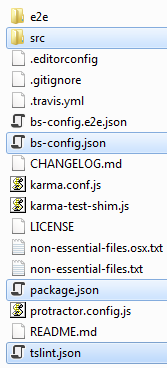
Copy the above files/folders and paste them in the root directory of "Angular2Demo" web application project. Now click "Show All File" icon in "Solution Explorer" and include all the copied files/folders in the project. At this stage your project structure in Visual Studio should be as shown below.
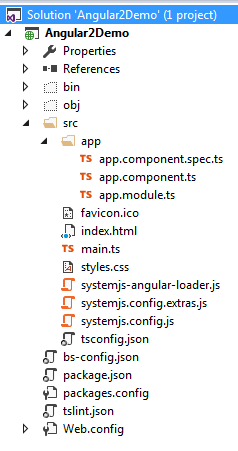
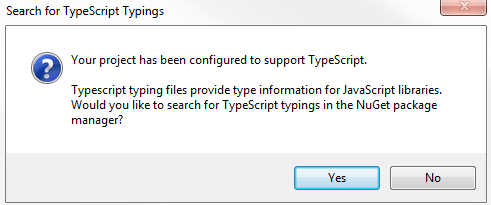
When including the files in the project if you get a prompt to "Search for Typescript Typings" click "No"
Step 8 : Restore the required packages.
In the "Solution Explorer" right click on "package.json" file and select "Restore Packages" from the context menu. This takes a few minutes to load all the modules. You can see the status in "Visual Studio Output" window. After the restoration is complete, you will see a message "Installing Packages Complete". To see all the installed node modules, click on "Show all Files" icon in Solution Explorer. DO NOT include "node_modules" folder in the project.

Step 9 : Run the project
- In the "RUN" window type "cmd" and press enter
- Change the directory in the command prompt to the directory where you have the web application project. I have my web application project in "C:\Angular2Demo\Angular2Demo". So I have typed CD C:\Angular2Demo\Angular2Demo and upon pressing the enter key I am in the root folder.
- Type "npm start" and press "Enter" key

- This launches the TypeScript compiler (tsc) which compile the application and wait for changes. It also starts the lite-server and launches the browser where you will see the output - Hello Angular.
- At this point, open "app.component.ts" file from "Solution Explorer". This file is present in "app" folder in "src" folder.
- Change "name" value from "Angular" to "Angular 2!" and you will see the changes reflected on the web page automatically.
In this video we will discuss how to run angular 2 application from visual studio using F5 or CTRL + F5.
This is continuation to Part 2. Please watch Part 2 from Angular 2 tutorial before proceeding.
At the moment, if we run the application from Visual Studio, using F5 or CTRL+F5, we get the message "Loading AppComponent content here ..." but nothing happens beyond that. To be able to run the application using F5 or CTRL+F5 we need to make the following changes.
1. Launch browser developers tools by pressing F12. Notice we have "404 Not Found" errors for the following files.
- styles.css
- systemjs.config.js
- main.js

All these files are present in "src" folder. So to fix these "404 Not Found" errors, in index.html file, change <base href="/"> to <base href="/src/">
2. Save the changes and reload the page. At this point we get another set of "404 Not Found" errors for the following files.
- shim.min.js
- zone.js
- system.src.js

To fix these errors, in index.html change the above script references as shown below. Notice, we have included "/" just before node_modules
Also in systemjs.config.js file, CHANGE
At this point reload the page and you will see "Hello Angular" message without any errors.
One important point to keep in mind is that, now we will not be able to run the application using "npm start" command.
We still have one more issue. Let us first understand the issue.
1. Expand "app" folder. This folder is inside "src" folder
2. Open "app.component.ts" file
3. Set name="Angular 2!" from name="Angular"
4. Save the changes and reload the web page
5. Notice, we do not see the changes on the web page
6. However, if we run the application by pressing F5 or CTRL+F5 from visual studio we see the changes in the browser.
So what is the issue?
TypeScript is not complied to JavaScript when we save the file and this the reason we do not see the changes in the browser. However, when we run the application by pressing F5 or CTRL+F5 from visual studio TypeScript is compiled to JavaScript and we see the changes.
If you want Visual Studio to compile TypeScript to JavaScript when the changes are saved, we need to turn this feature "ON" by including the following setting in tsconfig.json file. You will find this file in "src" folder. Notice we have set "compileOnSave" to true. With this change tsconfig.json file looks as shown below.
At this point TypeScript is automatically compiled to JavaScript when the file is saved, so the changes are reflected in the browser when the page is reloaded.
At the moment, we are using Visual Studio built-in IIS express server. In a later video in this course we will discuss how to use full blown IIS instead of Visual Studio built-in IIS express.
In this video tutorial we will discuss - What is a component in Angular 2
In Part 1 of Angular 2 tutorial,
we discussed that everything in Angular 2 is a component i.e components
are the basic building blocks of an Angular application.
What is a component in Angular 2
A
component in Angular is a class with a template and a decorator. So in
simple terms a component in Angular is composed of these 3 things
- Template - Defines the user interface. Contains the HTML, directives and bindings.
- Class - Contains the code required for template. Just like a class in any object oriented programming language like C# or Java, a class in angular can contain methods and properties. Properties contain the data that we want to display in the view template and methods contain the logic for the view. We use TypeScript to create the class.
- Decorator - We use the Component decorator provided by Angular to add metadata to the class. A class becomes an Angular component, when it is decorated with the Component decorator.
Component Example : In Part 2 of Angular 2 tutorial,
we have downloaded quick start files from the Angular Website. One of
the files in these quick start files, is the app.component.ts file. You
can find this file in the "app" folder. This file contain a component.
The name of the component is AppComponent. The AppComponent is
the root component of the application. I have commented the code in the
following example and it should be self-explanatory. If it's not, please
watch the video by clicking here.
Notice in the index.html page, we have used the AppComponent using the directive <my-app>. At runtime <my-app> directive is replaced with the HTML we specified using the selector property in the component decorator.
When we build the project in Visual Studio TypeScript is compiled to JavaScript which the browser understands and renders. Our TypeScript code for this component is present in app.component.ts file. Notice a corresponding app.component.js is file is generated on build. To see the generated .js file click on show-all-files icon in solution explorer. Besides .js files, there are several other files. We will discuss what these files are, their purpose and how angular application bootstraps itself using these files in our upcoming videos.
In this video we will discuss template and templateurl properties of the Component decorator. This is continuation to Part 4, please watch Part 4 from Angular 2 tutorial before proceeding.
In Part 4,
we have used an inline view template. Notice the code we have
implemented in app.component.ts file. We have embedded the view template
inline in the .ts file.
import { Component
} from '@angular/core';
The
view template is inline in a pair of backtick characters. The first
question that comes to our mind is can't we include the HTML in a pair
of single or double quotes. The answer is "YES" we can as long as the
HTML is in a single line. So this means the above code can be rewritten
using a pair of single quotes as shown below.
template: '<h1>Hello {{name }}</h1>'
We
can also replace the pair of single quotes with a pair of double quotes
as shown below, and the application still continues to work exactly the
same way as before.
template: "<h1>Hello {{name }}</h1>"
The obvious next question that comes to our mind is when should we use backticks instead of single or doublequotes
If
you have the HTML in more than one line, then you have to use backticks
instead of single or double quotes as shown below. If you use single or
double quotes instead of backticks you will get an error.
template: `<h1>
Hello {{name }}
</h1>`
Instead
of using an inline view template, you can have it in a separate HTML
file. Here are the steps to have the view template in a separate HTML
file
Step 1 : Right click on the "app" folder and add a new HTML file. Name it "app.component.html".
Step 2 : Include the following HTML in "app.component.html"
Step 3 : In "app.component.ts", reference the external view template using templateUrl property as shown below. Notice instead of the "template" property we are using "templateUrl" property. Please note that templateUrl path is relative to index.html
What are the differences between template and templateUrl properties and when to use one over the other
Angular2 recommends to extract templates into a separate file, if the view template is longer than 3 lines. Let's understand why is it better to extract a view template into a seprate file, if it is longer than 3 lines.
With an inline template
- We loose Visual Studio editor intellisense, code-completion and formatting features.
- TypeScript code is not easier to read and understand when it is mixed with the inline template HTML.
- We have Visual Studio editor intellisense, code-completion and formatting features and
- Not only the code in "app.component.ts" is clean, it is also easier to read and understand
In
this video we will discuss nesting angular components i.e including a
component inside another component. This is continuation to Part 5, please watch Part 5 from Angular 2 tutorial before proceeding.
As
we already know Angular 2 is all about components. A component in
Angular allows us to create a reusable UI widget. A component can be
used by any other component. Let's look at a simple example of nesting a
component inside another component.
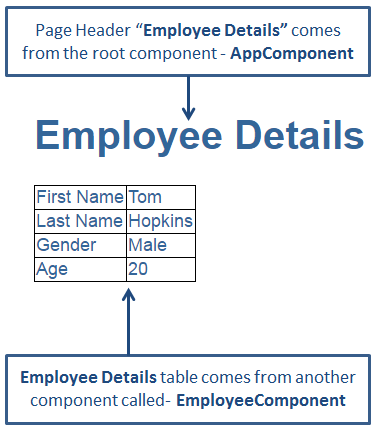
Here is what we want to do. Create a page that displays Employee details as shown below.

As you can see from the image below we want to create 2 components
- AppComponent - This component is the root component and displays just the page header
- EmployeeComponent - This component is the child component and displays the Employee details table. This child component will be nested inside the root AppComponent
Step 1 : Right click on the "App" folder and add a new folder. Name it "employee". We will create our EmployeeComponent in this folder.
Step 2 :
Right click on the "employee" folder and add a new HTML page. Name it
employee.component.html. Copy and paste the following HTML.
<table>
Step 3 : Right click on the "employee" folder and add a new TypeScript file. Name it employee.component.ts. Copy and paste the following code in it. At this point we have our child component EmployeeComponent created. Next let's create the root component - AppComponent.
Step 4 : We are going to use the root component to just display the page header. So in "app.component.ts" file, include the following code. Notice, since the View Template HTML is just 3 lines we have used an inline template instead of an external template. Angular2 recommends to extract templates into a separate file, if the view template is longer than 3 lines.
At this point if we run the application, we only see the page header - "Employee Details", but not the table which has the employee details. To be able to display employee details table along with the page header, we will have to nest EmployeeComponent inside AppComponent. There are 2 simple steps to achieve this.
Step 1 : In "app.module.ts" file we need to do 2 things as shown below.
- Import EmployeeComponent
- Add EmployeeComponent to the declarations array
What is AppModule
AppModule is the root module which bootstraps and launches the angular application. You can name it anything you want, but by convention it is named AppModule.
It imports 2 system modules - BrowserModule and NgModule
- BrowserModule - Every application that runs in a browser needs this module. In a later video in this course we will discuss NgIf and NgFor directives which are also provided by this module.
- NgModule - @component decorator adds metadata to an angular component class, similarly @NgModule decorator adds metadata to the angular module class.
Properties of the @NgModule decorator
- imports - Imports the BrowserModule required for an angular application to run in a web browser
- declarations - Contains the components registered with this module. In our case we have two - AppComponent and EmployeeComponent
- bootstrap - Contains the root component that Angular creates and inserts into the index.html host web page
Run the application and you will see both page header and the employee details table. The employee details table is not styled very well. To style the table, include the following styles for <td> and <table> elements in styles.css file.
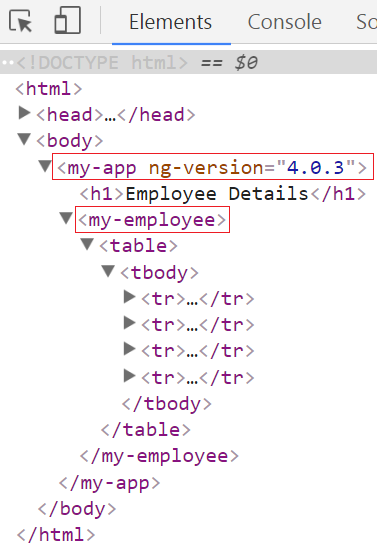
Run the application and you will now see the employee details table with the specified styles applied. At this point, launch browser developers tools and click on the "Elements" tab and notice <my-app> and <my-employee> directives in the rendered HTML.
In this video we will discuss the different options available to apply styles to Angular Components. This is continuation to Part 6. Please watch Part 6 from Angular 2 tutorial before proceeding.
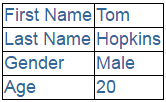
In our previous video we have built "employee" component which displays employee details in a table as shown below.
employee.component.ts
employee.component.html
Option 1: Specify the following <table> and <td> styles in external stylesheet - styles.css
Advantages :
- Visual Studio editor features (Intellisense, Code completion & formatting) are available.
- Application maintenance is also easy as we only have to change the styles in one place if we need to change them for any reason.
- The Stylesheet that contains the styles must be referenced for the component to be reused.
- Since styles.css is referenced in index.html page, these styles may affect the table and td elements in other components, and you may or may not want this behaviour.
Advantages :
- Visual Studio editor features (Intellisense, Code completion & formatting) are available.
- Component can be easily reused as the styles are defined inline
- Styles specified using this approach are local to the component and don't collide with styles used elsewhere in the application.
- Application maintenance is difficult. For example, if we want to change the <td> border colour to red we have to change it in several places.
Advantages :
- Component can be easily reused as the styles are defined inline with in the component itself
- Application maintenance is also easy as we only have to change the styles in one place
- Visual Studio editor features (Intellisense, Code completion & formatting) are available
- Styles specified using this approach are local to the component and don't collide with styles used elsewhere in the application.
Advantages :
- Component can be easily reused as the styles are defined inline with in the component itself
- Application maintenance is also easy as we only have to change the styles in one place for this component if we need to change them for any reason.
- Styles specified using this approach are local to the component and don't collide with styles used elsewhere in the application.
- Visual Studio editor features (Intellisense, Code completion & formatting) are not available.
Step 1 : Right click on the "employee" folder and add a new StyleSheet. Name it employee.component.css
Step 2 : Copy and paste the following styles for <table> and <td> elements in employee.component.css
Step 3 : In employee.component.ts file reference employee.component.css stylesheet using styleUrls property as shown below. Please note, the stylesheet path is relative to index.html file.
Advantages :
- Component can be easily reused as both the stylesheet itself and it's path are included with in the component
- Application maintenance is also easy as we only have to change the styles in one place
- Visual Studio editor features (Intellisense, Code completion & formatting) are available
- Styles specified using this approach are local to the component and don't collide with styles used elsewhere in the application.
In this video we will discuss the concept of Interpolation in Angular.
Interpolation is all about data binding. In Angular data-binding can be broadly classified into 3 categories
| Data Binding | Description |
| One way data-binding | From Component to View Template |
| One way data-binding | From View Template to Component |
| Two way data-binding | From Component to View Template & From View template to Component |
In
this video, we will discuss the first one way data-binding i.e From
Component to View Template. We achieve this using interpolation. We will
discuss the rest of the 2 data-binding techniques in our upcoming
videos.
One way data-binding
- From Component to View Template : To display read-only data on a view
template we use one-way data binding technique interpolation. With
interpolation, we place the component property name in the view
template, enclosed in double curly braces: {{propertyName}}.
In
the following example, Angular pulls the value of the firstName
property from the component and inserts it between the opening and
closing <h1> element.
import { Component } from '@angular/core';
Output :

It is also possible to concatenate a hard-coded string with the property value
The above expression displayes "Name = Tom" in the browser.
You can specify any valid expression in double curly braces. For example you can have
The above expression evaluates to 60
The
expression that is enclosed in double curly braces is commonly called
as Template Expression. This template expression can also be a ternary
operator as shown in the example below. Since firstName property has a
value 'Tom', we see it in the browser.
If we set firstName = null as shown below. The value 'No name specified' is displayed in the browser
firstName: string = null;
You can also use interpolation to set <img> src as shown in the example below.
})
}
We can also call class methods using interpolation as shown below.
Output : Full Name = Tom Hopkins
In this video we will discuss Property binding in Angular with examples.
In Part 8, we discussed we can use interpolation to bind component class properties to view template. Another option to achieve exactly the same thing is by using Property binding.
In our previous video we have bound imagePath property of the component class to <img> element src property using interpolation as shown below.
<img src='{{imagePath}}'/>
We can rerwrite the above example, using property binding as shown below. Notice the <img> element src property is in a pair of square brackets, and the component class property is in quotes.
<img [src]='imagePath'/>
Both Interpolation and Property binding flows a value in one direction, i.e from a component's data property into a target element property.
What is the difference between Interpolation and Property binding
Interpolation is a special syntax that Angular converts into a property binding.
Interpolation is just a convenient alternative to property binding.
In some cases like when we need to concatenate strings we have to use interpolation instead of property binding as shown in the example below.
<img src='http://www.pragimtech.com/{{imagePath}}' />
When setting an element property to a non-string data value, you must use property binding. In the following example, we are disabling a button by binding to the boolean property isDisabled.
<button [disabled]='isDisabled'>Click me</button>
If we use interpolation instead of property binding, the button is always disabled irrespective of isDisabled class property value
<button disabled='{{isDisabled}}'>Click me</button>
Some important points to keep in mind when using Property binding
Remember to enclose the property name with a pair of square brackets. If you omit the brackets, Angular treats the string as a constant and initializes the target property with that string.
<span [innerHTML]='pageHeader'></span>
With Property binding we enclose the element property name in square brackets
<button [disabled]='isDisabled'>Click me</button>
We can also use the alternate syntax with bind- prefix. This is known as canonical form
<button bind-disabled='isDisabled'>Click me</button>
From security standpoint, Angular data binding sanitizes malicious content before displaying it on the browser. Both interpolation and property binding protects us from malicious content.
In the example below we are using interpolation. Notice the malicious usage of <script> tag.
Angular interpolation sanitizes the malicious content and displays the following in the browser
Hello <script>alert("Hacked");</script> World
In this example below we are using property binding.
'<div [innerHtml]="badHtml"></div>'
Property binding sanitizes the malicious content slightly differently and we get the following output, but the important point to keep in mind is both the techniques protect us from malicious content and render the content harmlessly.
Hello alert("Hacked"); World
In this video we will discuss the difference between HTML attribute and DOM property.
What is DOM
DOM stands for Document Object Model. When a browser loads a web page, the browser creates a Document Object Model of that page.
For example, for the HTML below,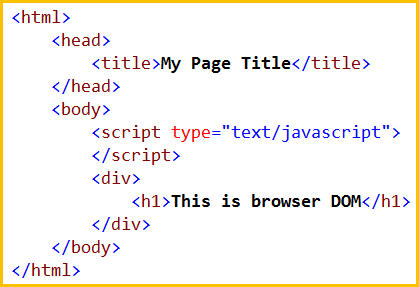
The browser creates a Document Object Model of that page as shown below
So in simple terms you can think of the DOM as an application programming interface (API) for HTML, and we can use programming languages like JavaScript, or JavaScript frameworks like Angular to access and manipulate the HTML using their corresponding DOM objects.
In other words DOM contains the HTML elements as objects, their properties, methods and events and it is a standard for accessing, modifying, adding or deleting HTML elements.
In the previous 2 videos we discussed interpolation and property binding in Angular.
Interpolation example
<button disabled='{{isDisabled}}'>Click Me</button>
Property binding example
<button [disabled]='isDisabled'>Click Me</button>
If you notice the above 2 examples, it looks like we are binding to the Button's disabled attribute. This is not true. We are actually binding to the disabled property of the button object. Angular data-binding is all about binding to DOM object properties and not HTML element attributes.
What is the difference between HTML element attribute and DOM property
- Attributes are defined by HTML, where as properties are defined by the DOM.
- Attributes initialize DOM properties. Once the initialization complete, the attributes job is done.
- Property values can change, where as attribute values can't.
Let's prove this point - Property values change, but the attribute values don't with an example.
In the example below, we have set the value attribute of the input element to Tom.
<input id='inputId' type='text' value='Tom'>
At this point, run the web page and in the textbox you will see 'Tom' as the value.
Launch the browser developer tools.
On the 'Console' tab, use the getattribute() method and value property of the input element to get the attribute and property values. Notice at the moment both have the value 'Tom'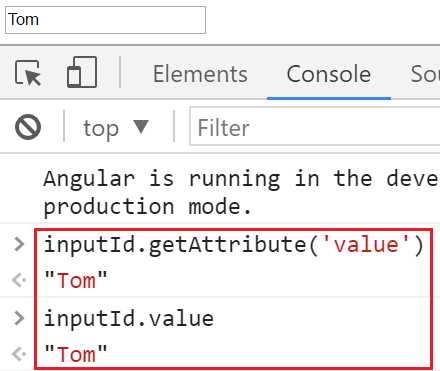
Change the value in the textbox to Mary.
Notice now, when we query for the attribute and property values, the attribute value is still Tom but the property value is Mary. So this proves the point - Property values change, where as attribute values don't.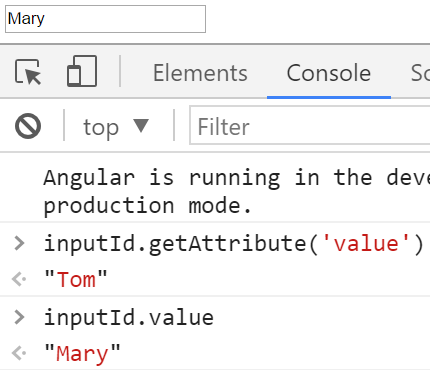
So it is important to keep in mind that,
- HTML attributes and the DOM properties are different things.
- Angular binding works with properties and events, and not attributes.
- The role of attributes is to initialize element properties and their job is done.
In this video we will discuss Attribute Binding in Angular
In our previous videos we discussed Interpolation and Property binding that deal with binding Component class properties to HTML element properties and not Attributes.
However, in some situations we want to be able to bind to HTML element attributes. For example, colspan and aria attributes does not have corresponding DOM properties. So in this case we want to be able to bind to HTML element attributes.
To make this happen, Angular provides attribute binding. With attribute binding we can set the value of an attribute directly. Angular team recommends to use Property binding when possible and use attribute binding only when there is no corresponding element property to bind.
Let us understand Attribute Binding in Angular with an example. We want to display Employee Details in a table as shown below.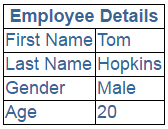
To achieve this we are going to make use of Employee component we have implemented in Part 6 of Angular 2 tutorial.
In our root component - app.component.ts we have the following code
Code in employee.component.ts file
Code in employee.component.css file
Code in employee.component.html file
Notice at the moment we have hard-coded colspan attribute value to 2 in the HTML. Instead we want to bind to a component class property. So in the employee.component.ts file include 'columnSpan' property as shown below.
If we use interpolation to bind columnSpan property of the component class to colspan attribute of the <th> element we get the error - Can't bind to 'colspan' since it isn't a known property of 'th'
We get the same error if we use Property Binding
This error is because we do not have a corresponding property in the DOM for colspan attribute. To fix this we have to use attribute-binding in Angular, which sets the colspan attribute. To tell angular framework that we are setting an attribute value we have to prefix the attribute name with attr and a DOT as shown below.
The same is true when using interpolation
In this video we will discuss CSS Class binding in Angular with examples.
For the demos in this video, we will use same example we have been working with so far in this video series. In styles.css file include the following 3 CSS classes. If you recollect styles.css is already referenced in our host page - index.html.
.boldClass{
In app.component.ts, include a button element as shown below. Notice we have set the class attribute of the button element to 'colorClass'.
At this point, run the application and notice that the 'colorClass' is added to the button element as expected.
Replace all the existing css classes with one or more classes
Modify the code in app.component.ts as shown below.
- We have introduced a property 'classesToApply' in AppComponent class
- We have also specified class binding for the button element. The word 'class' is in a pair of square brackets and it is binded to the property 'classesToApply'
- This will replace the existing css classes of the button with classes specified in the class binding
Run the application and notice 'colorClass' is removed and these classes (italicsClass & boldClass) are added.
Adding or removing a single class : To add or remove a single class, include the prefix 'class' in a pair of square brackets, followed by a DOT and then the name of the class that you want to add or remove. The following example adds boldClass to the button element. Notice it does not remove the existing colorClass already added using the class attribute. If you change applyBoldClass property to false or remove the property altogether from the AppComponent class, css class boldClass is not added to the button element.
With class binding we can also use ! symbol. Notice in the example below applyBoldClass is set to false. Since we have used ! in the class binding the class is added as expected.
You can also removed an existing class that is already applied. Consider the following example. Notice we have 3 classes (colorClass, boldClass & italicsClass) added to the button element using the class attribute. The class binding removes the boldClass.
To add or remove multiple classes use ngClass directive as shown in the example below.
- Notice the colorClass is added using the class attribute
- ngClass is binded to addClasses() method of the AppComponent class
- addClasses() method returns an object with 2 key/value pairs. The key is a CSS class name. The value can be true or false. True to add the class and false to remove the class.
- Since both the keys (boldClass & italicsClass) are set to true, both classes will be added to the button element
- let is a new type of variable declaration in JavaScript.
- let is similar to var in some respects but allows us to avoid some of the common gotchas that we run into when using var.
- The differences between let and var are beyond the scope of this video. For our example, var also works fine.
- As TypeScript is a superset of JavaScript, it supports let
We have included our css classes in a external stylesheet - styles.css. Please note we can also include these classes in the styles property instead of a separate stylesheet as shown below.
In this video we will discuss Style binding in Angular with examples.
Setting inline styles with style binding is very similar to setting CSS classes with class binding. Please watch Class binding video from Angular 2 tutorial before proceeding with this video.
Notice in the example below, we have set the font color of the button using the style attribute.
The following example sets a single style (font-weight). If the property 'isBold' is true, then font-weight style is set to bold else normal.
style property name can be written in either dash-case or camelCase. For example, font-weight style can also be written using camel case - fontWeight.
Some styles like font-size have a unit extension. To set font-size in pixels use the following syntax. This example sets font-size to 30 pixels.
To set multiple inline styles use NgStyle directive as shown below
- Notice the color style is added using the style attribute
- ngStyle is binded to addStyles() method of the AppComponent class
- addStyles() method returns an object with 2 key/value pairs. The key is a style name, and the value is a value for the respective style property or an expression that returns the style value.
- let is a new type of variable declaration in JavaScript.
- let is similar to var in some respects but allows us to avoid some of the common gotchas that we run into when using var.
- The differences between let and var are beyond the scope of this video. For our example, var also works fine.
- As TypeScript is a superset of JavaScript, it supports let
In this video we will discuss Event Binding in Angular with examples.
The following bindings that we have discussed so far in this video series flow data in one direction i.e from a component class property to an HTML element property.
1. Interpolation
2. Property Binding
3. Attribute Binding
4. Class Binding
5. Style Binding
How about flowing data in the opposite direction i.e from an HTML element to a component. When a user performs any action like clicking on a button, hovering over an element, selecting from a dropdownlist, typing in a textbox etc, then the corresponding event for that action is raised. We need to know when user performs these actions. We can use angular event binding to get notified when these events occur.
For example the following is the syntax for binding to the click event of a button. Within parentheses on the left of the equal sign we have the target event, (click) in this case and on the right we have the template statement. In this case the onClick() method of the component class is called when the click event occurs.
With event binding we can also use the on- prefix alternative as shown below. This is known as the canonical form
Event Binding Example :
Every time we click the button, 'Button Clicked' message is logged to the console. You can see this message under the Console tab, in the browser developer tools.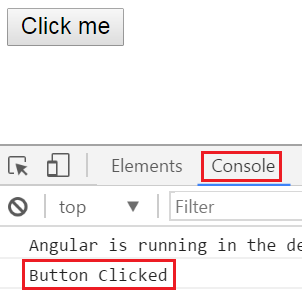
Another Example : Initially when the page loads we want to display only the First Name and Last of Employee. We also want to display "Show Details" button.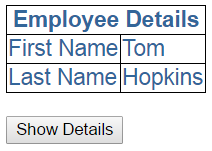
When we click "Show Details" button, we want to display "Gender" and "Age" as well. The text on the button should be changed to "Hide Details". When we click "Hide Details" button, "Gender" and "Age" should be hidden and the button text should be changed to "Show Details".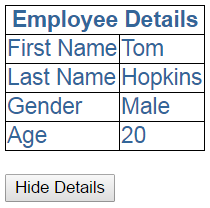
To achieve this we will make use of event binding in Angular. We will also make use of one of the structural directives "ngIf" in angular.
Code in employee.component.ts : Notice we have introduced "showDetails" boolean property. The default value is false, so when the page first loads, we will have "Gender" and "Age" hidden. We also have a method, toggleDetails(), which toggles the value of showDetails.
Code in employee.component.html :
- Notice the click event of the button is binded to toggleDetails() method
- To dynamicall change the text on the button, we are using ternary operator - {{showDetails ? 'Hide' : 'Show'}} Details
- We used ngIf structural directive on "Gender" and "Age" <tr> elements
- The * prefix before a directive indicates, it is a structural directive
- Besides ngIf, there are other structural directives which we will discuss in our upcoming videos
- The ngIf directive conditionally adds or removes content from the DOM based on whether or not an expression is true or false
- If "showDetails" is true, "Gender" and "Age" <tr> elements are added to the DOM, else removed
In this video we will discuss Two way Data Binding in Angular 2.
Consider the following code in app.component.ts
- <input [value]='name'> : Binds component class "name" property to the input element’s value property
- You entered : {{name}} : Interpolation displays the value we have in "name" property on the web page
Here is the output

At
the moment when we change the value in the textbox, that changed value
is not reflected in the browser. One way to achieve this is by binding
to the input event of the input control as shown below.
At this point, as we type in the textbox, the changed value is displayed on the page.

So let's understand what is happening here. Consider this code
- [value]='name' : This property binding flows data from the component class to element property
- (input)='name = $event.target.value' : This event binding flows data in the opposite direction i.e from the element to component class property "name"
- $event - Is exposed by angular event binding, and contains the event data. To retrieve the value from the input element use - $event.target.value.
- name = $event.target.value - This expression updates the value in the name property in the component class
- You entered : {{name}} - This interpolation expression will then display the value on the web page.
Name : <input [value]='name' (input)='name = $event.target.value'>
Like this : Name : <input [(ngModel)]='name'>
At this point if you view the page in the browser, you will get the following error
Template parse errors:
Can't bind to 'ngModel' since it isn't a known property of 'input'
This is because ngModel directive is, in an Angular system module called FormsModule. For us to be able to use ngModel directive in our root module - AppModule, we will have to import FormsModule first.
Here are the steps to import FormsModule into our AppModule
1. Open app.module.ts file
2. Include the following import statement in it
import { FormsModule } from '@angular/forms';
3. Also, include FormsModule in the 'imports' array of @NgModule
imports: [BrowserModule, FormsModule]
With these changes, reload the web page and it will work as expected.
So here is the syntax for using two-way data binding in Angular
<input [(ngModel)]='name'>
- The square brackets on the outside are for property binding
- The parentheses on the inside are for event binding
- To easily remember this syntax, compare it to a banana in a box [()]
In Part 14 of Angular 2 tutorial we discussed ngIf structural directive which conditionally adds or removes DOM elements. In this video we will discuss another structural directive - ngFor in Angular.
Let us understand ngFor structural directive with an example. Consider the following array of Employee objects.
employees: any[] = [
We want to display these employees in a table on a web page as shown below.
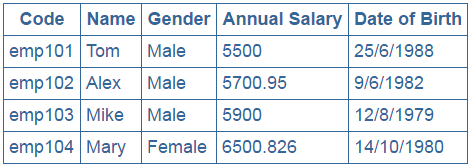
We will use the same project that we have been working with so far in this video series.
Step 1 : Add a new TypeScript file to the "employee" folder. Name it employeeList.component.ts. Copy and paste the following code in it.
Step 2 : Add a new HTML page to the "employee" folder. Name it employeeList.component.html. Copy and paste the following code in it.
Please note :
- ngFor is usually used to display an array of items
- Since ngFor is a structural directive it is prefixed with *
- *ngFor='let employee of employees' - In this example 'employee' is called template input variable, which can be accessed by the <tr> element and any of it's child elements.
- ngIf structural directive displays the row "No employees to display" when employees property does not exist or when there are ZERO employees in the array.
Step 3 : Add a new StyleSheet to the "employee" folder. Name it employeeList.component.css. Copy and paste the following code in it.
Step 4 : In the root module, i.e app.module.ts, import employeeList component and add it to the declarations array as shown below.
Step 5 : In the root component, i.e app.component.ts use employeeList component as a directive as shown below.
In this video we will discuss
1. Using trackyBy with ngFor directive
2. How to get the index of an item in a collection
3. Identifying the first and the last elements in a collection
4. Identifying even and odd elements in a collection
Using trackyBy with ngFor directive :
- ngFor directive may perform poorly with large lists
- A small change to the list like, adding a new item or removing an existing item may trigger a cascade of DOM manipulations
The constructor() initialises the employees property with 4 employee objects getEmployees() method returns another list of 5 employee objects (The 4 existing employees plus a new employee object)
import { Component } from '@angular/core';
@Component({
export class EmployeeListComponent {
employees: any[];
constructor() {
getEmployees(): void {
Now look at this code in employeeList.component.html
<button (click)='getEmployees()'>Refresh Employees</button>
At the moment we are not using trackBy with ngFor directive
- When the page initially loads we see the 4 employees
- When we click "Refresh Employees" button we see the fifth employee as well
- It looks like it just added the additional row for the fifth employee. That's not true, it effectively teared down all the <tr> and <td> elements of all the employees and recreated them.
- To confirm this launch browser developer tools by pressing F12.
- Click on the "Elements" tab and expand the <table> and then <tbody> elements
- At this point click the "Refresh Employees" button and you will notice all the <tr> elements are briefly highlighted indicating they are teared down and recreated.

This happens because Angular by default keeps track of objects using the object references. When we click "Refresh Employees"
button we get different object references and as a result Angular has
no choice but to tear down all the old DOM elements and insert the new
DOM elements.
Angular can avoid this churn with trackBy. The trackBy function
takes the index and the current item as arguments and returns the
unique identifier by which that item should be tracked. In our case we
are tracking by Employee code. Add this method to employeeList.component.ts.
In this video we will discuss Pipes in Angular with examples.
Pipes in Angular
- Transform data before display
- Built in pipes include lowercase, uppercase, decimal, date, percent, currency etc.
- To apply a pipe on a bound property use the pipe character " | " <td>{{employee.code | uppercase}}</td>
- We can also chain pipes<td>{{employee.dateOfBirth | date:'fullDate' | uppercase }}</td>
- Pass parameters to pipe using colon " : "
<td>{{employee.annualSalary | currency:'USD':true:'1.3-3'}}</td><td>{{employee.dateOfBirth | date:'fullDate'}}</td><td>{{employee.dateOfBirth | date:'dd/MM/y'}}</td> - Custom pipes can be created
- To read more about angular built-in pipes
Please note :
If you get the following error, chances are that your date is not in
mm/dd/yyyy format. To fix this error please change the date format to
mm/dd/yyyy or create a custom pipePipe
URL
Date
https://angular.io/api/common/DatePipe
Decimal
https://angular.io/api/common/DecimalPipe
Currency
https://angular.io/api/common/CurrencyPipe
Percent
https://angular.io/api/common/PercentPipe
InvalidPipeArgument: '14/10/1980' for pipe 'DatePipe'
Angular Pipe Examples:
uppercase pipe in this example converts employee code to uppercase
<td>{{employee.code | uppercase}}</td>
Output :

In this example, we have chained date and uppercase pipes.
<td>{{employee.dateOfBirth | date:'fullDate' | uppercase }}</td>
Output :
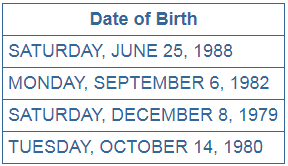
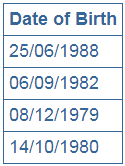
In
this example we are passing a single parameter to date pipe. With the
parameter we specified we want the date format to be dd/mm/yyyy
<td>{{employee.dateOfBirth | date:'dd/MM/y'}}</td>
Output :
For the list of date pipe parameter values please check the following article DatePipe
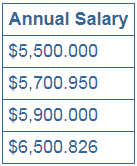
In this example we are passing 3 parameters to the currency pipe
<td>{{employee.annualSalary | currency:'USD':true:'1.3-3'}}</td>
- The first parameter is the currencyCode
- The second parameter is boolean - True to display currency symbol, false to display currency code
- The third parameter ('1.3-3') specifies the number of integer and fractional digits
About Instructor
Reviews
-
No reviews for this Course


